How To Archive A Facebook Group – 2024 Best Note
Welcome to the world of Facebook groups, where like-minded individuals gather to share ideas, collaborate, and connect.
Whether you’re a part of a hobby group, a professional network, or simply a fan club for your favorite TV show, these virtual communities have become an integral part of our online lives.
But what happens when a Facebook group has served its purpose or is no longer active? That’s where archiving comes in.
In this article, we’ll explore what it means to archive a Facebook group and why you might want to do so.
Plus, we’ll guide you through the step-by-step process on how to archive a Facebook group using different devices.
So if you find yourself wondering how to tidy up your digital space or put an end to that once-thriving community gracefully and efficiently – stick around! It’s time to unravel the mysteries behind archiving a Facebook group!
Table of Contents
What Happens When You Archive A Facebook Group?
When you choose to archive a Facebook group, it means that you are putting it in a sort of “sleep mode.” It’s like hitting the pause button on the group’s activity. But what exactly happens when you make this decision?
Archiving a Facebook group means that all posts and comments within the group become hidden from members’ news feeds.
This can be beneficial if you want to take a break from managing or participating in the group without deleting it completely.
Additionally, when a Facebook group is archived, members will still be able to see past content and search for specific posts or information within the group.
However, they won’t be able to create new posts or engage in any new discussions until the admin decides to reactivate the group.
It’s important to note that archiving doesn’t remove any members or delete any content permanently. It simply puts things on hold until you’re ready to resume activity.
Archiving also allows administrators to retain all settings and configurations of their groups while taking them out of active circulation temporarily.
This can be useful for groups organizing events or campaigns with specific time frames.
Choosing to archive your Facebook group provides flexibility and control over its visibility and engagement without losing valuable content or member connections
Reasons To Archive A Facebook Group
Archiving a Facebook group can be a strategic move for various reasons. Here are some compelling reasons why you might consider archiving your Facebook group:
#01. Inactivity
If your group has become inactive with minimal engagement or participation, archiving it can save you time and resources.
It allows you to focus on more active groups that align with your goals.
#02. Transitioning Focus
As businesses evolve, their target audience and objectives may change.
Archiving a Facebook group that no longer serves its purpose enables you to redirect your efforts toward new ventures or communities aligned with your current goals.
#03. Privacy Concerns
Sometimes, privacy concerns arise within a Facebook group due to sensitive discussions or the need for greater confidentiality.
By archiving the group, you can limit access and ensure that only approved members have visibility.
#04. Rebranding Or Restructuring
When rebranding or restructuring an organization, it’s essential to reflect these changes across all platforms – including social media groups.
Archiving the old group allows you to create a fresh start while maintaining an archive of previous conversations if needed.
#05. Maintenance Reduction
Managing multiple active groups requires significant effort and attention from administrators and moderators alike.
By archiving less active groups, you free up valuable time and resources while still retaining content for future reference.
Archiving a Facebook group provides several benefits ranging from streamlining administrative duties to creating space for new opportunities in line with evolving objectives – all while preserving important historical information within reach if necessary.
How To Archive A Facebook Group On Laptop Or PC
- To start archiving a Facebook group on your computer, log into your Facebook account and navigate to the homepage.
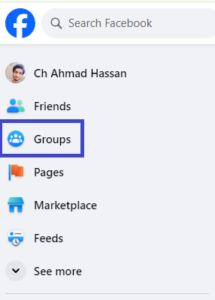
- On the left-hand side of the screen, find and click on “Groups.” This will open up all the groups you are currently part of.

- Scroll through until you find the specific group you want to archive.
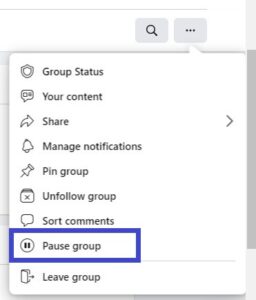
- Once located, select it, and click on the three dots under its cover photo. There will be a drop-down menu with several choices.

- Choose “Archive Group” or “Pause Group” from this menu.

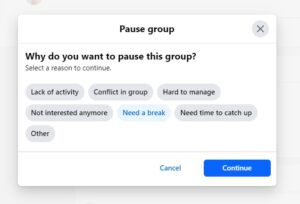
- Select the reason to pause or archive a “Facebook Group” and click on “Continue.”

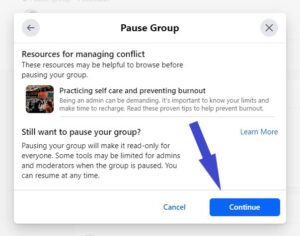
- After selecting that option, Facebook will prompt you with a confirmation message asking if you’re sure about archiving the group.
- Confirm your decision by clicking on “Continue.” And just like that, your Facebook group is now archived!

Archiving can be done easily within minutes using these steps on both laptops and PCs.
How To Archive A Facebook Group On iPhone
- On your iPhone, launch the Facebook app and sign in to your account.
- Go to the Groups tab located at the bottom of the screen.
- Find the group that you want to archive and tap on it to open it.
- Once inside the group, tap on the three dots icon in the top right corner of the screen.
- From the menu that appears, select “Archive Group” or “Pause Group.” Confirm your decision by tapping “Archive” again when prompted.
- You have successfully archived a Facebook group on your iPhone!
How To Archive A Facebook Group On Android
To do the task, follow these easy steps:
- Open the Facebook app on your Android device and log in to your account.
- Navigate to the group you want to archive. You can do this by tapping on the menu icon (three horizontal lines) at the top right corner of the screen and selecting “Groups” from the list.
- Once you’re in the Groups section, find and tap on the specific group that you wish to archive.
- On the group page, tap on the three dots menu icon at the top right corner of your screen. This will reveal a variety of choices in a drop-down menu.

- From this drop-down menu, select “Archive Group” or “Pause Group.”

- A confirmation message will appear asking if you want to archive the group. Tap “Pause group” to proceed.

You have successfully archived your Facebook group on Android.
Conclusion
Archiving a Facebook group can be a useful tool for managing and preserving the content of your online community.
Whether you want to take a break from actively running the group or simply want to keep it as a record of past conversations, archiving provides an efficient solution.
The process of archiving varies slightly depending on whether you’re using a laptop or PC, iPhone, or Android device.
Regardless of your preferred method, following these step-by-step instructions will guide you through successfully archiving your Facebook group.
Remember that archived groups can still be accessed by admins and members with permission.
If at any point in the future, you decide to reactivate the group, simply follow the same steps outlined above but select “Unarchive” instead.
What does archiving a Facebook group do?
Archiving a Facebook group essentially puts it on hold. Members can still view the group and its content, but they won’t be able to post anything new, add new members, or like or comment on existing posts.
Can anyone archive a Facebook group?
Only group admins can archive a group.
Is there a difference between archiving and deleting a Facebook group?
Yes, there is a big difference. Archiving hides the group from public view and prevents activity, but the group and its content still exist. Deleting a group is permanent and cannot be undone.


