How to Change Your Name on Facebook – Perfect Guide 2024
Your Facebook profile is your online identity, and sometimes, circumstances may lead you to consider changing your name on the platform.
Whether it’s due to a life event, personal preference, or a desire to use a nickname, understanding the process and Facebook’s name change policy is crucial.
In this article, we’ll walk you through the steps of changing your name on Facebook, both on a desktop browser and the mobile app.
Additionally, we’ll explore Facebook’s name change policy and how to incorporate a nickname into your profile.
Table of Contents
How to Change Your Name on Facebook on Laptop
Changing your name on Facebook is a straightforward process, but it’s essential to follow the platform’s guidelines to ensure a smooth transition.
Here is step by step-by-step guide to changing your name on Facebook using a laptop:
Login to Your Facebook Account:
- Launch your favorite browser and navigate to www.facebook.com.
- Enter your phone number or email address and password to access your Facebook account.
Access Settings:
- Once logged in, click on the “Arrow” in the top right corner of the screen to open the dropdown menu.
- Once “Settings & Privacy” has been selected, click “Settings”.
Edit Your Name:
- In the left-hand menu, click on “Personal Information”.
- Find the “Name” section and click “Edit” on the right.
Enter Your New Name:
- Input your first and last name as you’d like them to appear on your profile.
- Facebook provides an option for displaying your name differently, such as using a maiden name or nickname.
Review Changes and Save:
- Facebook will prompt you to review your name changes.
- Ensure everything is accurate, and then click “Review Change”.
Confirm Your Password:
- To finalize the process, enter your Facebook password when prompted.
- Click “Save Changes”, and your new name will be updated on your profile.
Change Your Name on Facebook on Mobile App
Open the Facebook App:
- Launch the “Facebook app” on your mobile device.
Go to Your Profile:
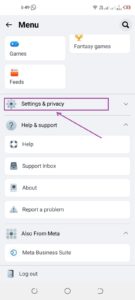
- Tap the “three horizontal lines” in the bottom right corner.

- Tap “Settings & Privacy” by swiping down.

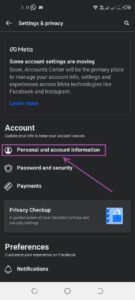
- Tap “Settings”.

Edit Your Profile:
- Under the “Privacy” section, tap on “Personal Information”.

- Choose “Name” and enter your new name.

Save Changes:
- Review your changes and tap “Review Change”.

- Input your Facebook password to validate the modifications.
- Tap “Save Changes” to update your name on the mobile app.

How to Use a Nickname on Facebook
Using a nickname on Facebook allows you to express your personality and connect with friends on a more informal level.
Here’s how you can incorporate a nickname into your Facebook profile:
Navigate to Your Profile:
- To view your profile settings, go to the previously specified instructions.
Edit Your Name:
- In the “Name” section, click “Edit”.
Add Your Nickname:
- Include your nickname in the provided fields.
- Facebook allows you to add an alternate name, which can be displayed alongside your real name.
Adjust Privacy Settings:
- Choose who can see your alternate name by adjusting the privacy settings.
- Options typically include “Public”, “Friends”, or “Only Me”.
Save Changes:
- Review the changes and click “Save Changes” to apply your nickname.
Facebook Name Change Policy
Understanding Facebook’s name change policy is crucial to avoid any issues or potential rejection of your name change request.
There are restrictions on the names you can and cannot use on Facebook, even though you are not required to give your entire legal name.
Facebook encourages users to use their real names while interacting with the platform. The following cannot appear in Facebook names:
- Punctuation, symbols, numerals, odd capitalization, or repeated letters
- Personas drawn from multiple languages
- Titles of any kind (religious, professional, or otherwise)
- Instead of a name, use words or phrases
- Inflammatory or provocative language
Facebook permits first or middle-name nicknames as long as they are a variant of your real name (e.g., Abby rather than Abigail). On Facebook, it is not permitted to pose as another individual.
While the platform is generally flexible, there are certain guidelines to follow:
Real Name Requirement:
- Facebook requires users to use their real names to promote authenticity.
- Generally speaking, titles, numerals, symbols, and pseudonyms are not permitted.
Frequency of Name Changes:
- Facebook may limit the frequency of name changes to prevent misuse.
- Users are encouraged to choose a name they can stick with for an extended period.
Verification Process:
- In some cases, Facebook might request additional verification if your name change seems suspicious.
- Providing official identification can help expedite the process.
Pages and Profiles:
- Facebook Pages representing businesses or public figures may have additional restrictions.
- It’s advisable to review the specific guidelines for pages.
Conclusion
In conclusion, Changing your name on Facebook is a personal decision that allows you to reflect your identity accurately.
Whether you’re going through a life transition, adopting a nickname, or simply want a change, following Facebook’s guidelines ensures a smooth and hassle-free process.
By understanding the steps involved in changing your name on Facebook both desktop and mobile platforms, along with incorporating a nickname, you can tailor your Facebook profile to suit your preferences.
How often can I change my name on Facebook?
You can only change your Facebook name once every 60 days. So choose wisely!
What happens to my old profile URL after I change my name?
Your profile URL will usually update automatically to reflect your new name.
Will my friends be notified when I change my name?
Yes, Facebook will typically notify your friends that you’ve changed your name.


