How To Delete A Facebook Group – 2024 Perfect Guide
Welcome to the world of Facebook Groups – a virtual space where like-minded individuals gather, connect, and share their passions.
Whether you’re part of a hobby group, an alumni association, or a local community network, these groups can be a hub of activity and camaraderie.
But what if circumstances change? What if it’s time to bid farewell to your once-beloved Facebook Group? In this article, we’ll guide you through the process of deleting a Facebook Group.
So put on your digital gloves as we dive into the steps and precautions necessary for bidding adieu to your online community!
Table of Contents
Why You Should Delete A Facebook Group
Running a Facebook group can be an exciting endeavor. It allows you to connect with like-minded individuals, share information, and foster a sense of community.
However, there may come a time when deleting the group becomes necessary.
#01. Inactive Or Irrelevant
One reason why you might consider deleting your Facebook group is if it has become inactive or irrelevant.
If members are no longer engaged and discussions have dwindled, it may be time to move on. Deleting the group will free up your time and energy for more productive ventures.
#02. No Longer Aligns With Goals Or Values
Another reason to delete a Facebook group is if it no longer aligns with your goals or values. As our interests evolve, so do our priorities.
If the focus of your group has shifted or no longer resonates with you, it’s perfectly valid to bid farewell and explore new opportunities.
#03. Privacy concerns
Privacy concerns can also factor into the decision to delete a Facebook group. While groups offer various privacy settings, they cannot guarantee complete control over member interactions or data security.
If maintaining privacy is paramount for you and your community members’ peace of mind, migrating to a more secure platform may be worth considering.
Precautions Before Deleting A Facebook Group
Before you go ahead and delete your Facebook group, there are a few important precautions to keep in mind.
These steps will help ensure that the process goes smoothly and that you don’t accidentally lose any valuable information or upset your members.
#01. Inform Your Members
It’s essential to communicate with your group members before deleting it. Give them ample time to save any important discussions, photos, or files they may want to keep for future reference.
#02. Appoint New Admins
If your group is still active and has a dedicated community, consider appointing new admins who can take over the management responsibilities after deletion.
This way, the group can continue thriving without losing its sense of unity.
#03. Save Important Content
Before pulling the plug on your Facebook group, make sure to save any crucial content that you might need later on.
This could include insightful discussions, event announcements, or other valuable resources shared within the community.
#04. Archive Group Data
In case you ever decide to revisit your decision or analyze past activities in detail, consider archiving all data related to the group before deletion. This includes posts, comments, member lists – everything!
#05. Plan An Exit Strategy
Think about how you’ll redirect members after deleting your Facebook group. Consider suggesting alternative platforms where they can connect and continue their conversations if they wish.
Remember these precautions when deleting a Facebook group so that everything goes smoothly during this transition period!
How To Delete A Facebook Group On PC/Laptop
Deleting a Facebook group on a PC or laptop is a straightforward process. Just follow the below-given instructions to delete a Facebook Group using your laptop or PC.
- To begin, make sure you are logged into your Facebook account and navigate to the group that you want to delete.
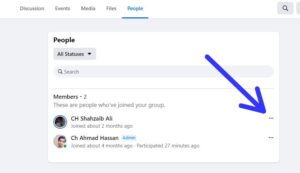
- Once there, click on “Members” in the left-hand menu and then click on three dots in front of the names of members.
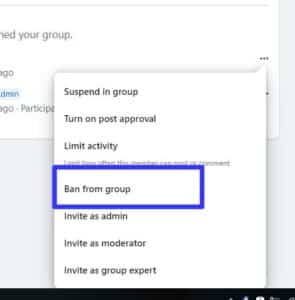
- From the menu, select Remove Member or Ban from group. Do this process for every member until only you are left in the group.
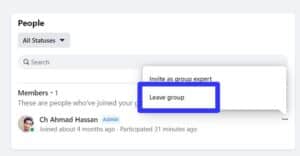
- Then leave the group and an option will appear to you to “Delete group” because you will be the last member of the group.
- Confirm the decision by clicking on Delete Group.
How To Delete A Facebook Group On Mobile
Deleting a Facebook group on your mobile device is just as simple as it is on a PC or laptop. Here’s how you can do it:
- Launch the Facebook app on your mobile device and log in to your account.
- Tap on the menu icon (three horizontal lines) located at the top-right corner of the screen, then scroll down and select “Groups.”
- Scroll through your list of groups until you find the one you want to delete. Tap on the name of the group to open it.
- Once inside the group, tap “Info” below the cover photo, then select “People”.
- Click on three dots that are located in front of the member’s name and from the options, click on the Remove member.
- Repeat this process for every member until only you are the last member of the group.
- Then leave the group and confirm it by clicking on Delete Group.
How To Delete A Facebook Group And Migrate To Other Platform
If you’ve decided to delete your Facebook group and migrate to another platform, it’s important to have a clear plan in place.
This process can seem daunting at first, but it can be done smoothly with the right steps.
#01. Choose Alternative Platform
Make sure you choose an alternative platform that suits your needs and objectives.
There are plenty of options available such as Slack, Discord, or even starting your website with forum capabilities.
Research these platforms thoroughly to find the one that aligns with your group’s goals.
#02. Inform Your Members
Next, inform your members about the upcoming migration.
Be transparent and provide them with all the necessary information about why you’re making this change and what they need to do next.
Some may feel hesitant or resistant initially, so be prepared for questions and concerns.
#03. Backup Essential Content
Before deleting your Facebook group completely, make sure to back up any essential content or discussions that you want to preserve for future reference on the new platform.
This will ensure a smooth transition without losing valuable information.
#04. Delete The Group
Once everything is set up on the new platform and members are onboarded successfully, it’s time to officially delete your Facebook group.
Follow the steps mentioned earlier in this article specific for PC/laptop or mobile devices depending on where you access Facebook from.
Remember that migrating from one platform to another requires patience and effective communication throughout every step of the process.
By following these guidelines carefully, you’ll ensure a seamless transition for both yourself and your community members.
Conclusion
Deleting a Facebook Group can be a necessary step for various reasons, such as lack of activity or the need to migrate to another platform.
However, before taking this decision, it’s important to consider some precautions to ensure that you’re making the right choice.
Taking backup of important data and notifying group members are crucial steps in the process. By following these precautions, you can minimize any potential loss and maintain good relationships with your group members.
Alternatively, if you want to migrate your group to another platform without losing valuable content or members.

