How to Schedule a Post on Facebook – 2025 Best Way
Scheduling posts on Facebook is a powerful way to save time, maintain consistency, and engage your audience effectively. Whether you’re a business owner, content creator, or social media manager, scheduling a post on Facebook can streamline your workflow and boost your online presence. In this guide, we’ll walk you through the process step by step.
Table of Contents
Reasons to Schedule a Post on Facebook
1. Consistency is Key
Consistency is crucial for building a strong online presence. Scheduling posts allows you to maintain a regular posting schedule without worrying about forgetting to post.
2. Reach Your Audience at the Right Time
Different audiences are active on Facebook at various times. By scheduling your posts, you can target these peak times for maximum engagement.
3. Save Time and Energy
Instead of interrupting your day to post, you can plan and schedule your content in one sitting, freeing up your time for other important tasks.
4. Plan Content Strategically
Scheduling helps you plan your content, ensuring a balanced mix of promotional, educational, and entertaining posts.
Can I schedule posts on my personal Facebook profile?
No, Facebook’s scheduling feature is only available for groups. Personal profiles do not have this functionality.
How to Schedule a Post on Facebook Using Mobile
You can’t schedule a post on Facebook for your personal profile or a business page. This feature is only available for groups now.
Step 1: Open the Facebook App
Ensure you have the Facebook app installed on your smartphone and log in to your account.
Step 2: Navigate to Your Group
Tap on the three horizontal lines (menu icon) and select your group from the list.
Step 3: Create Your Post
Tap the “Create Post” button. Add your text, images, or video content as you normally would.
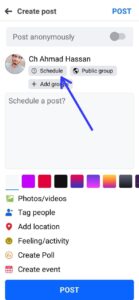
Step 4: Access Scheduling Options
Instead of tapping “Post,” look for the “Schedule” option (often located in the “More Options” menu) but it can be at the top of your post box.
Step 5: Set the Date and Time
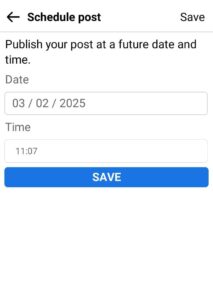
Choose the exact date and time you want your post to go live. Ensure it aligns with your audience’s active hours.
Step 6: Save and Schedule
Tap “Save” or “Schedule,” depending on your app version, and your post is ready to go live at the specified time.
How to Turn Off Online Status on Facebook – 2024 Perfect Note
How to Schedule a Post on Facebook Using Laptop/PC
Step 1: Log In to Facebook
Head to Facebook.com and log in to your account.
Step 2: Go to Your Group
Click on “Groups” in the left-hand menu, then select the group you wish to manage.
Step 3: Create a New Post
Click the “Create Post” button. Add your content, including text, images, or links.
Step 4: Open Publishing Tools
Click on “Scheduling icon” located at the bottom right corner.
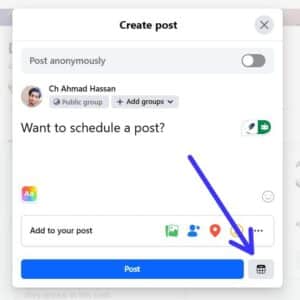
Step 5: Schedule the Post
Select “Schedule” and set your desired date and time.
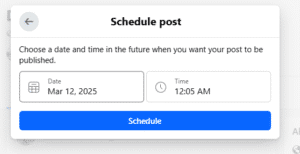
Step 6: Confirm and Save
Click “Schedule Post,” and your content will be queued for publishing at the specified time.
Conclusion
Scheduling posts on Facebook is a game-changer for anyone looking to optimize their social media strategy. It not only saves time but also ensures that your content reaches the right audience at the perfect moment. Whether you’re using a mobile device or a computer, the process is straightforward and incredibly rewarding.
FAQs
1. Can I edit a scheduled post?
Yes, you can edit scheduled posts. Simply go to “Publishing Tools” or “Meta Business Suite,” find the scheduled post, and make your changes.
2. Is there a limit to how many posts I can schedule?
Facebook does not specify a hard limit, but most users can schedule as many posts as they need.
3. Can I cancel or delete a scheduled post?
Absolutely! Navigate to your scheduled posts and delete or reschedule any post as needed.
4. What happens if the scheduled time passes and the post doesn’t go live?
This is rare, but if it happens, check your internet connection or ensure there are no account restrictions. You may need to manually publish the post.

